You’ve heard it everywhere: contactless credit card payments are in and customers want this payment option at your business. But this is a new tech, and as with anything new in technology, learning how to accept Google Pay at your business can sound like a daunting task. In reality, though, Google has made it quite easy to accept touchless payments for businesses, even for those with the most basic tech know-how. All it takes is a little guidance, and today we’ll show you how easy it is to get customers to pay with phones at your place of business or website.
What is Google Pay, and Why Use it?
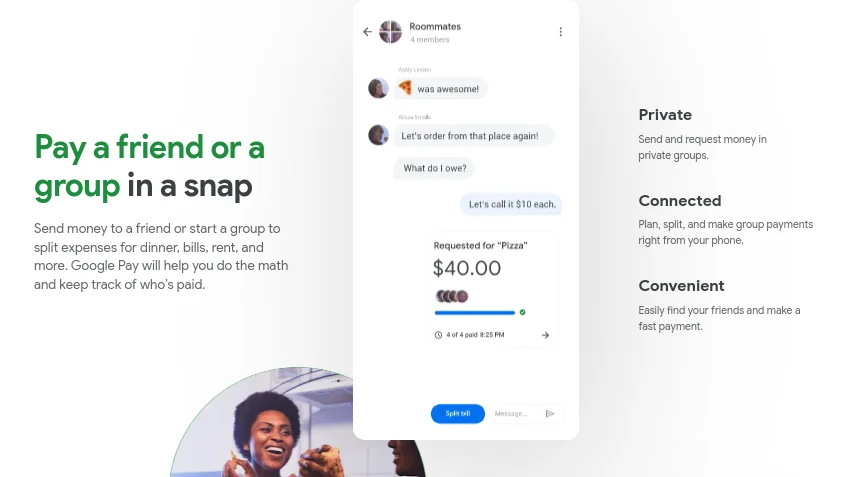
In the world of contemporary business, one of the hottest topics is accepting credit cards as contactless payments with a smartphone. Once a high-tech novelty, the ability to simply tap your phone at the register has become nearly ubiquitous, showing up everywhere from gas stations to restaurants and beyond. Customers seem to love the ease and security of contactless pay, or as it’s more formally known, near-field communication (NFC) technology.
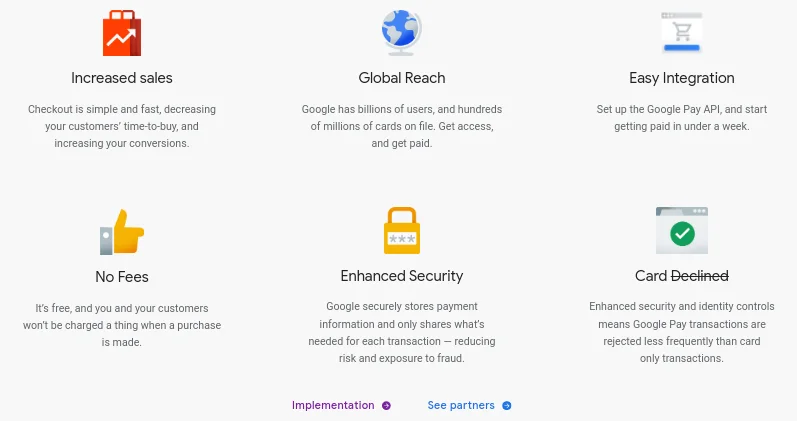
It’s easy to see why people are flocking to smart phone payments at the register: It’s more sanitary (a major concern these days), it’s super convenient, and it’s better at protecting business against fraudulent payments both because it’s backed by Google’s deep security tech that disguises a customer’s real credit card number and because the customer isn’t swiping anything physical that could be copied, accidentally dropped, or easily stolen. With the “cool” factor of waving your phone in the air to quickly pay, more and more customers are coming to not just desire but actually expect contactless pay from their shopping or dining experiences. As the tech continues to spread, it’s become very important for businesses of all kinds to set up Google Pay for websites and in-store payments, as you never want to lose sales simply because you can’t accept Google Pay or touchless payments.
How to Set Up Google Pay at Your Business
Luckily, it’s extremely easy to set up Google Pay for your business! In most cases, your merchant account provider can provide you with point-of-sale hardware that is ready to accept Google Pay payments at your register without any extra steps on your part. If you are already accepting credit card payments at your business, call your merchant account provider to inquire how they can help you accept contactless payments. If you are a new business, or wanting to switch your merchant services provider, see our recommended merchant accounts as all of them can set you up with touchless payments. In some cases you might have to go through the process directly with Google Pay. In such cases, it’s easy and here’s all you’ll need to doLuckily, it’s extremely easy to set up Google Pay for your business! In most cases, your merchant account provider can provide you with point-of-sale hardware that is ready to accept Google Pay payments at your register without any extra steps on your part. If you are already accepting credit card payments at your business, call your merchant account provider to inquire how they can help you accept contactless payments. If you are a new business, or wanting to switch your merchant services provider, see our recommended merchant accounts as all of them can set you up with touchless payments. Depending on your merchant account provider, you might have to go through the process directly with Google Pay. In such cases, it’s easy and here’s all you’ll need to do
Step 1: Make sure you have a UPI ID from your bank
Contactless pay is enabled through something called a Unified Payments Interface ID, or UPI ID. These are special identifying numbers set up by your bank that allow you to accept Google payments and other NFC payments, and it should only take a short phone call to your bank to get one for your business.
Step 2: Connect your UPI ID to a Virtual Payment Address
Where the UPI ID is what your bank sets up to connect your payments to your account, your Virtual Payment Address is what tells your payment terminals which bank account to deposit the money into. Again, this is very easy to set up in most cases. Once you’ve received your UPI ID from your bank, the bank should be able to tell you which UPI-enabled app works with your UPI ID. If they don’t offer that information up-front, just ask, and then download that app. Now use your UPI ID to sign in to the app, and then follow the app’s instructions to create a VPA. This will involve entering your bank account info, choosing an address name, and creating a PIN for that address.
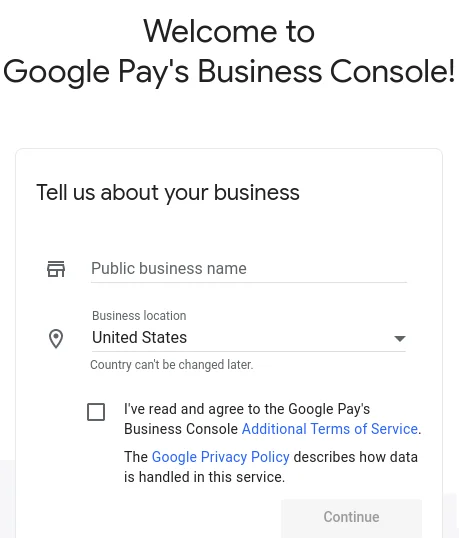
Step 3: Setup a Google Pay Account on the Google Pay Website
Next, have your VPA and UPI ID ready and head over to the Google Pay setup website. This step requires a free Google account. Typically this will be a business account, but Google allows you to use personal Google accounts as well. Once you visit the Google Pay setup link and sign into your Google account, Google will walk you through the initial setup and ask for your business name, UPI ID, VPA, and an associated phone number.
After you’ve input your business info, Google will attempt to deposit a few cents into your VPA in order to confirm that everything is set up correctly. Google will then prompt you to input the exact amount they deposited, and once you do so correctly, it will complete the Google Pay signup process.
Step 4: Wait for Google Review
At this point, Google will put your submission into its review process, so you’ll simply have to wait a short time for Google to confirm your account. As long as everything has been entered and connected correctly, this should be quick and easy. If there are any issues, Google will contact you and let you know what needs to be fixed before you can start accepting payments
Step 5: Connect Your Google Pay Account to Point of Sale Systems
Now that you have a functioning Google Pay account, you just need to connect it to your in-store payment systems. This will be different depending on what POS or other payment system you are already using, but luckily Google has partnered with the vast majority of POS manufacturers out there to make it simple to set up your POS for NFC payments. Everything from new e-commerce units from Square, to major POS systems like Clover, to EMV card readers from Ingenico, PAX, and Verifone can take NFC payments as long as you have a fairly new machine (from the last few years). If you’re unsure whether your terminals can accept NFC, ask your merchant account provider, and they’ll be able to quickly let you know. You can also purchase your own NFC-ready POS system if you don’t have one already (which is often much cheaper than buying or leasing one from your provider).
When you have your NFC-ready terminal or other system, use its built-in software to point it to your Google Pay account. This may require Googling the setup process or calling your card payment processor, but it’s usually a very straightforward process that you can do just by following the instructions on your machine.
Step 6: Start Accepting Google Pay Payments
You’re ready to take Google Pay payments! This is all it takes to accept Google Pay in your store, and now when a customer goes to check out, they will have the option to tap their phone close to your terminal and avoid all that pesky credit card business.
A note: You can make sure customers know that you accept Google Pay with a free sticker kit from Google, which they will send you and you can put up on your terminals, in your window, and around your business.
Further Reading: Setting Up Google Pay for Your Website or App
While the above should get you set up quickly and painlessly for in-store Google Pay payments, you can also accept Google Pay online and in your business’ personal app. This is slightly more complex, but if you’re familiar with APIs at all, it is still relatively simple to set up.
To do this, follow the above instructions through Step 4, and then sign in to your Google Business account on the web. There you’ll see a tab on the left that says “Google Pay API”. Click that, and it will walk you through setting up Google Pay for e-commerce payments. If you’re using something popular for your webshop such as Shopify or a common e-commerce gateway like Authorize.Net, this is a very simplified process. It can get a bit more complex with lesser-used gateways or a personal app, but don’t fret, Google wants your business and will happily help you set up its API on just about any kind of account.
And that’s it! You’re now NFC payment-ready and on the way to giving your customers an even better shopping experience. Welcome to the future of payments.
Share your experience with using Google Pay in the comment section below.